
Creating the UI for an adventure game is a fun little bite sized challenge I enjoy doing. The UI for Echoes of Somewhere is finally finding its groove.
I had always thought I would be using some fancy AI graphics for the UI. I even did some prompting for an adventure game UI and I was somewhat happy with the results. But as I was working on the game and added the first UI elements on the screen, I actually veered away from that idea. The UI is now fully man-made.
Cursors / Icons

The game’s cursors are in low polygon style and created in modo. The style is removed from the cyberpunk theme of the game on purpose, as they are meant to work on every episode of the game. These episodes may take place in any setting from any possible era.


I modelled the icons in Modo. I kept them very simple and clean. I would not be using much colors with them. Just one green accent in some rare cases.


The render style for the icons is simple as well. Just one key-light with a bounce plane for some fill light. These low poly icons are very easy to create and I think look pretty good In-game.
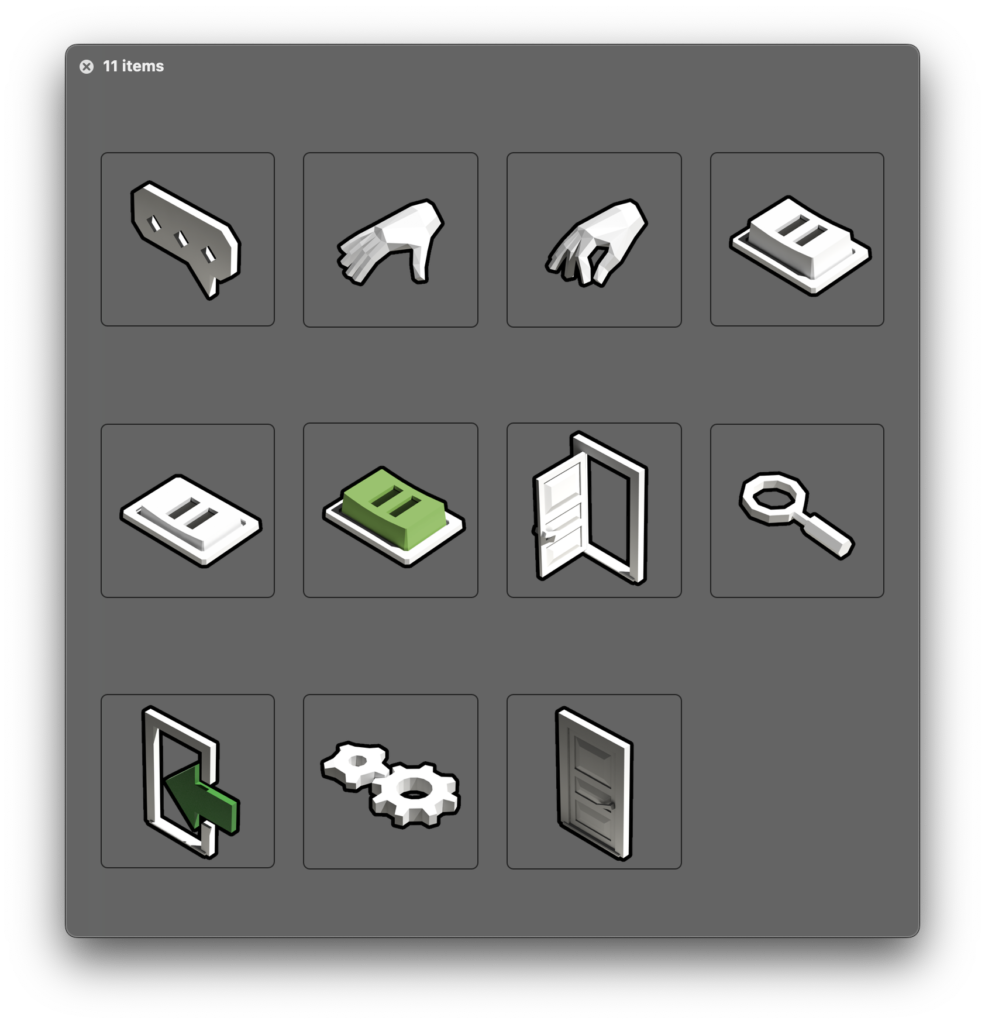
At first, I had these icons in use as cursor graphics. The mouse would change to the relevant action icon when hovering on top of a hotspot in the game. This meant that each hotspot only had one action. It was something along the lines of “look at”, “use”, “open”, “talk to”, “go-to”
For the hotspots I used a simple small inverted pyramid.

You can see the first version of the UI from the older game captures before this post.
There was nothing wrong with this user interface. It was passable. I have been creating different adventure game prototypes for a over a decade and they all have a different iteration of the point and click interface and I do like all of them. But this current one was not perfect in my opinion. I did not like the way the hotspots were marked on the screen with the green triangles. They were not doing it for me.
Then a horror adventure game called Stasis Bone Totem was released! In this game simply hovering on top of a hotspot prompted this examine text to view. I a pretty sure they were not the first to do it, but I loved this mechanic.

This was a very elegant solution for displaying examine text information on the screen without having to create alt actions for each hotspot that had an interaction other than look at! It would also make it fun to have multiple points of interest in the screen the player could hover over and read information about the world and about the internal dialogue the player is going trough in his head.
Bone Totem also was using different hotspot visualisations for things you could use, things you could also examine and screen exit points. I liked it. It made the screen easier to read but did not make the gameplay feel too simple.
I was going to take all the things I loved about their UI and put them in Echoes of Somewhere.

I started by adding a component for each hotspot that includes the examine text. Then I wrote an add-on for Adventure Creator that displays this text in an UI element every time the mouse is over a hotspot. Update 1/2024: in the latest version the text actually comes from a dialogue in an action list. Making it possible for the player to speak the descriptions out loud and for the text support localisation.

HotspotHighlighter.cs
using UnityEngine;
using System.Collections;
using AC;

public class HotspotHighlighter : MonoBehaviour
{
    private string Descriptiontext = "decription";
    private string DescriptionActiveItem = "active item description";

    public AudioClip _InventorySelectAudio;
    public AudioClip _InventoryDeselectAudio;
    public AudioClip _InventoryHoverAudio;
    public AudioClip _HotspotHoverAudio;
    public AudioSource audioSource;
    bool _playAudioHotspot = true;
    bool _playAudioInventory = true;
    bool _PDAOpen;
    float _horizontalSpeed = 0.0f;
    float _verticalSpeed = 0.0f;
    float _pitch = 1.0f;
    Vector2 _mouseVelocity;
    public float _pitchRange = 0.25f;
    public Texture empty;
    bool _PDAMode;
    public GameObject AudioSourcePrefab;
    private string hotspotName = "na";
    private string itemName = "na";
    [SerializeField] private float DescriptionDelay = 1.0f;
    private float DescriptionTimer = 0.0f;
    private bool timerOn = false;
    private ActionList _hotspotActionList;
    //INV DESC SPEECH private ActionListAsset _itemActionList;
    private string HotspotName;
    public int GetSpeechID()
    {
        if (_hotspotActionList != null)
        {
            foreach (AC.Action action in _hotspotActionList.actions)
            {
                if (action is ActionSpeech)
                {
                    return (action as ActionSpeech).lineID;
                }
            }
        }
        return -1;
    }

    void OnEnable()
    {
        EventManager.OnInventoryHover += itemHover;
        EventManager.OnInventoryDeselect += itemDrop;
        EventManager.OnInventorySelect += itemSelect;
        EventManager.OnHotspotSelect += OnHotspotSelect;
        EventManager.OnHotspotDeselect += OnHotspotDeselect;

        IntializeAudio();
    }

    void OnDisable()
    {
        EventManager.OnInventoryHover -= itemHover;
        EventManager.OnInventoryDeselect -= itemDrop;
        EventManager.OnInventorySelect -= itemSelect;
        EventManager.OnHotspotSelect -= OnHotspotSelect;
        EventManager.OnHotspotDeselect -= OnHotspotDeselect;

    }

    void IntializeAudio()
    {
        if (audioSource == null)
        {
            Debug.Log("Audio Source missing from level, creating audio source to level");
            GameObject AudioSourceObject = Instantiate(AudioSourcePrefab);
            audioSource = AudioSourceObject.GetComponent<AudioSource>();
        }
    }

    //Select item from the inventory
    void itemHover(InvCollection invCollection, InvInstance invInstance)
    {
        //check if the mouse is entering or exiting the inv item
        if (invInstance != null)
        {
            Debug.Log("Mouse over: " + invInstance);

            getPitch();

            DescriptionTimer = 0;

            audioSource.PlayOneShot(_HotspotHoverAudio, Options.GetSFXVolume());

            //gather UI elements
            MenuGraphic hotspotIcon = PlayerMenus.GetElementWithName("Hotspot", "Icon") as MenuGraphic;
            MenuLabel examineLabel = PlayerMenus.GetElementWithName("Hotspot", "ExamineLabel") as MenuLabel;
            MenuLabel hotspotlabel = PlayerMenus.GetElementWithName("Hotspot", "HotspotName") as MenuLabel;
            MenuGraphic invIcon = PlayerMenus.GetElementWithName("Hotspot", "Icon (INV)") as MenuGraphic;

            //set description Ui inv icon
            invIcon.SetNormalGraphicTexture(invInstance.InvItem.tex);

            //hide the hotspot icon
            hotspotIcon.graphic = KickStarter.cursorManager.GetCursorIconFromID(7);

            //display the description parameter text of the inv item
            examineLabel.label = invInstance.InvItem.GetProperty(0).TextValue;

            //Display the name of the item
            hotspotlabel.label = invInstance.InvItem.label;
        }
        else
        {
            skipActionlist();
        }
    }

    //Deselect the active inventory item
    void itemDrop(InvItem invItem)
    {
        Debug.Log(invItem + " deselected");
        if (audioSource != null)
        {
            audioSource.pitch = 1;
            audioSource.PlayOneShot(_InventoryDeselectAudio, Options.GetSFXVolume());
        }
        Debug.Log("Playing InventoryDeselectAudio for item drop");
    }

    //Activate an inventory item
    void itemSelect(InvItem invItem)
    {
        Debug.Log(invItem + " selected");

        //add play audio event here for selecting items.

        _PDAMode = AC.GlobalVariables.GetVariable(3).BooleanValue;

        audioSource.pitch = 1;

        if (_PDAMode == false)
        {
            audioSource.PlayOneShot(_InventorySelectAudio, Options.GetSFXVolume());
            Debug.Log("Playing InventorySelectAudio for item select");
        }

        _playAudioInventory = false;

    }
    void getPitch()
    {
        _horizontalSpeed = Input.GetAxis("Mouse X");
        _verticalSpeed = Input.GetAxis("Mouse Y");
        _mouseVelocity = new Vector2(_horizontalSpeed, _verticalSpeed).normalized;
        _pitch = ((_mouseVelocity[0] - _mouseVelocity[1]) * _pitchRange) + 1;
        audioSource.pitch = _pitch;
    }

    void skipActionlist()
    {
        //check if actionlist is set up and skip it to kill the voiceover for examine descriptions
        if (_hotspotActionList != null)
        {
            _hotspotActionList.Kill();
            KickStarter.dialog.KillDialog(true, false, SpeechMenuLimit.BackgroundOnly, SpeechMenuType.NarrationOnly, "Narrator");
        }
    }

    private void OnHotspotSelect(Hotspot hotspot)
    {
        Debug.Log("Hovering over the hotspot: " + hotspot.name);

        //gather UI elements
        MenuGraphic hotspotIcon = PlayerMenus.GetElementWithName("Hotspot", "Icon") as MenuGraphic;
        MenuLabel examineLabel = PlayerMenus.GetElementWithName("Hotspot", "ExamineLabel") as MenuLabel;
        MenuLabel hotspotlabel = PlayerMenus.GetElementWithName("Hotspot", "HotspotName") as MenuLabel;
        MenuGraphic invIcon = PlayerMenus.GetElementWithName("Hotspot", "Icon (INV)") as MenuGraphic;

        //get pitch from mouse velocity
        getPitch();

        //reset descriptiontimer
        DescriptionTimer = 0;

        //play hover audio
        audioSource.PlayOneShot(_HotspotHoverAudio, Options.GetSFXVolume());

        //kill actionlitsts before it is time
        skipActionlist();

        //reset the description timer
        DescriptionTimer = 0.0f;

        //Get icon for the hotspot to show in the UI
        int _iconID = hotspot.GetFirstUseIcon();

        //if an item is selected, display the use icon for the hotspot on hover.
        if (KickStarter.runtimeInventory.SelectedItem != null)
        {
            hotspotIcon.graphic = KickStarter.cursorManager.GetCursorIconFromID(0);
        }
        //in other cases, display the icon for the use action, if it has an icon set.
        else if (_iconID != null)
        {
            hotspotIcon.graphic = KickStarter.cursorManager.GetCursorIconFromID(_iconID);
        }
        //no interaction has been set, display the looking glass icon.
        else
        {
            hotspotIcon.graphic = KickStarter.cursorManager.GetCursorIconFromID(2);
        }

        //hide the inventory item icon from the UI
        invIcon.SetNormalGraphicTexture(empty);

        //check if the hotspot has the examine text component
        if (hotspot.gameObject.TryGetComponent<ExamineText>(out var examineText))
        {
            //get the description text frpom the actionlist assigned to the hotspot
            if (examineText.DescriptionActionList != null)
            {
                _hotspotActionList = examineText.DescriptionActionList;
                Descriptiontext = KickStarter.speechManager.GetLine(GetSpeechID()).text;
            }
            else
            {
                Descriptiontext = examineText.Description;
            }

            //Check if a description actionlist has been assigned to the hotspot
            if (examineText.DescriptionActionList != null && AC.GlobalVariables.GetVariable(10).BooleanValue == true)
            {
                if (_hotspotActionList.AreActionsRunning() == false)
                {
                    timerOn = true;
                }

                //start description speech timer
                DescriptionTimer += Time.deltaTime;

                if (DescriptionTimer < DescriptionDelay)
                {
                    //skipActionlist();
                }
                else
                {
                    _hotspotActionList.Interact();
                }
            }
            else if (AC.GlobalVariables.GetVariable(10).BooleanValue == false)
            {
                //skipActionlist();
            }
        }

        examineLabel.label = Descriptiontext;
        hotspotlabel.label = KickStarter.playerInteraction.GetActiveHotspot().name;
    }

    private void OnHotspotDeselect(Hotspot hotspot)
    {
        skipActionlist();
        timerOn = false;
    }

    // Update is called once per frame
    void Update()
    {
        if (timerOn == true)
        {
            DescriptionTimer += Time.deltaTime;
        }
        else
        {
            DescriptionTimer = 0;
        }

        if (DescriptionTimer > DescriptionDelay)
        {
            _hotspotActionList.Interact();
            timerOn = false;
        }
    }
}
Once I had this descriptive text appearing at the bottom, I figured I might as well put everything down there. The verb, the hotspot name, and the interaction icon. This would clean up the game screen considerably! After this was done, I decided to try to replace the triangular hotspot icon with the interaction icon associated with each hotspot. So that by glancing at the screen you would already know what the interaction will be.

When there is no interaction, a magnifying glass would be displayed instead.
Now that the interaction icons were shown as hotspot markers, I was able to keep the cursor visible at all times. I did however add an “active” variant of the cursor for showing when you are hovering on something interactive to help a little, even though the appearance of the description box is already a big hint!

Previously I did not have any markers to indicate exit points in the scenes, but I now added one as inspired by Bone Totem. These markers help you see the scene exit points a lot more clearly and take the guesswork out of it.
The new iteration of the Ui is pretty minimalistic and clean. I am somewhat pleased with it. But already I am thinking of transitioning from Adventure Creator UI to Unity UI and with that I will need to redo parts of the functionality, like hiding and showing the panels and once I program them by hand I am sure going to add functionality to them that I have not yet thought of…
Things I also changed:
-Walk to indicator. I animated this small jumping triangle that shows where the character is about to walk to.
-Inventory visibility. I changed the inventory from being buried under a toggle button, to being visible at all times. It makes the player think of the inventory items and their combinations with on screen hotspots more easily.
The tooling
The tool I am using mainly to create this game is an add-on to Unity called Adventure Creator.
I have been using this tool for about 10 years for personal projects and prototypes because it contains so much functionality I need and it is very easy to build on top of. I have never had a bad experience with it. I am extremely pleased at how versatile it is for customising the way the players can interact with your game.
It also provides save and loading functionality, a pretty good scripting and events system, inventory management, quest logging and even crafting. It can also easily be used for any other type of game than point and clci adventure games as a great starting point


Leave a Reply